Web Interface to a Node.js REST service

Web Interface to a Node.js REST service
Web Interface to a Node.js REST service using Jade, Stylus, jQuery and AJAX.
Introduction
This tutorial is a continuation of the previous tutorial REST Service with Node.js, MongoDB and Express. In this section, we will be adding a web interface to the REST service that we created. Since explanations were already covered for some of the parts in the previous tutorial, we won’t re-visit the explanations here. We will only cover the code that is being changed for this tutorial.
The code for this tutorial is available here on github.
Getting Started
The first step is to setup a new route. If you remember, the previous example you could use the address https://localhost:3000/users to access the REST service, but the root path returned nothing. This time we will add a web page to the root which will be used to manage the “users” REST service.
The following line will be added to the app.js file:
app.get('/', routes.index);
This line adds a route to the node.js application, it uses the path “/”, which means you will hit it when going directly to https://localhost:3000/. We pass as the second parameter routes.index, this tells it to use the file /routes/index.js. Also, we have added a constructor parameter to the UserManager object so that it now takes the app object as a parameter.
Now the whole app.js file looks like this:
var express = require('express')
  , routes = require('./routes')
  , http = require('http')
  , path = require('path');

var app = express();

// all environments
app.set('port', process.env.PORT || 3000);
app.set('views', __dirname + '/views');
app.set('view engine', 'jade');
app.use(express.favicon());
app.use(express.logger('dev'));
app.use(express.bodyParser());
app.use(express.methodOverride());
app.use(app.router);
app.use(require('stylus').middleware(__dirname + '/public'));
app.use(express.static(path.join(__dirname, 'public')));

// development only
if ('development' == app.get('env')) {
  app.use(express.errorHandler());
}

var UserManager = require('./userManager').UserManager;
var userManagerService = new UserManager(app);

app.get('/', routes.index);

http.createServer(app).listen(app.get('port'), function(){
  console.log('Express server listening on port ' + app.get('port'));
});
A quick look at the UserManager.js file shows that we have changed the constructor:
UserManager = function(app) {
	var UserProvider = require('./userProvider-mongodb').UserProvider;
	var userProvider = new UserProvider(mongoServer, mongoPort);
	app.set('userProvider', userProvider);
This was so that we could add a parameter to the app object, this parameter is the UserProvider object. We are doing this because we will want to access this object from the index route.
Setting Up The Route
Next we setup the /routes/index.js file, it will look like this:
exports.index = function(req, res){
	var userProvider = req.app.get('userProvider');

	userProvider.fetchAllUsers(function(error, users) {
		if (error) {
			res.send(error, 500);
		} else {
			res.render('index', { title: 'User Manager', users:users });
		}
	});
};
Here we are adding the index route as a function, in that function we get the userProvider from the req.app object, this was the object that was provided by the UserManager object. Here we are showing that you can call this method directly from your route function, this is not technically using the REST service, but I wanted to show that you can use the implementation on the backend as well and to show how the jade template can iterate through results when building the page. For the other management functions we will have the client side of the web page call the REST service instead. Note that we are calling the fetchAllUsers function and if there is no error we call res.render giving it ‘index’ as the first parameter. This first parameter tells it to use the /views/index.jade for rendering. As the second parameter we are passing an object with two properties, one is the title we want to use for the page and the other is the actual list of User objects that was returned by the UserProvider.
Writing the Jade Template Code
Now let’s take a look at the /views/index.jade code:
extends layout

block content
  script(src='http://code.jquery.com/jquery-1.9.1.js')
  script(src='/javascripts/userManager-client.js')
  h1= title
  table
    thead
      tr
        th(class='dataColumn') ID
        th(class='dataColumn') Name
        th(class='dataColumn') City
        th(class='dataColumn') State
        th
    tbody
      - var i=0
      each user in users
        - i++
        tr(class=(i % 2 == 0) ? 'odd' : 'even', id=('id_' + i))
          td #{user._id}
          td
            input(value=(user.name),class='inputField')
          td
            input(value=(user.city),class='inputField')
          td
            input(value=(user.state),class='inputField')
          td
            button(onClick=('onUpdate(' + i + ')')) Update
            button(onClick=('onDelete(' + i + ')')) Delete
      - i++
      tr(class=(i % 2 == 0) ? 'odd' : 'even')
        td
        td
          input(class='inputField',id='txtName')
        td
          input(class='inputField',id='txtCity')
        td
          input(class='inputField',id='txtState')
        td
          button(id='btnAdd',onClick='onAdd()') Add User
There is a lot of new stuff here so take a moment to look through the code and figure out how it works. It is generating HTML, in the “block content” section, the first thing it’s doing is importing two scripts, jQuery and userManager-client.js. After this it goes on to create a table with dynamic contents based on the “users” object passed in. Notice in the tbody section we create a variable using – var i = 0, this is a number we will use to determine odd or even rows. We increment this variable in the each user in users section, which iterates through each of the User objects in the users array giving it the variable name user.
For each row we create a tr element and several td objects. The first td contains the user._id, the next three contain the other fields displayed in an input element so that they can be edited. Finally, two buttons are added, “Update” and “Delete”. These two buttons call javascript functions which are in the userManager-client.js file. At the end of the table we add one more row which contains blank fields and a button for adding a user.
Coding the jQuery AJAX Calls
Now let’s take a look at the /public/javascripts/userManager-client.js file:
function onDelete(id) {
  sel = '#id_' + id;
  userId = $(sel).find('td:eq(0)').text();

  $.ajax({url:'/users/' + userId,type:'DELETE'}).done(function() {
    window.location.href = "/";
  });
}

function onUpdate(id) {
  sel = '#id_' + id;
  user = {};
  user._id = $(sel).find('td:eq(0)').text();
  user.name = $(sel).find('td:eq(1) input').val();
  user.city = $(sel).find('td:eq(2) input').val();
  user.state = $(sel).find('td:eq(3) input').val();

  request = $.ajax({url:'/users/' + user._id,type:'POST', data:user});

  request.done(function() {
    alert('user updated');
    window.location.href = "/";
  });

  request.fail(function(jqXHR, textStatus) {
    alert( "Request failed: " + textStatus );
  });
}

function onAdd() {
  user = {};
  user.name = $('#txtName').val();
  user.city = $('#txtCity').val();
  user.state = $('#txtState').val();

  request = $.ajax({url:'/users', type:'POST', data:user});

  request.done(function(msg) {
    window.location.href = "/";
  });
  request.fail(function(jqXHR, textStatus) {
    alert( "Request failed: " + textStatus );
  });
}
This script has functions for adding, updating and deleting users from the database using the REST service. The functions use jQuery to invoke AJAX calls to the REST service.
Let’s take a quick look at the onDelete function for example. The first line creates a variable sel which has the name of the id_ followed by the id field of the User object. Putting the # tells jQuery to look for an element with that “id” attribute. The second line finds that object by doing $(sel) then uses jQuery’s find method to find the first td element and return the text with the text function.
Now that we have the userId from that td element in the table, we invoke jQuery’s $.ajax function, the first parameter is an object which contains the URL, in this case it will be /users/{userId}, and the HTTP method type, which is “DELETE”. Once this is invoked, it will refresh the page by calling window.location.href = “/”. This is how all of the functions generally work for interacting with the REST service.
Styling The Page With Stylus
Finally, we will style the page so it doesn’t look so bland. To do this we will use the node.js module Stylus. This simply generates CSS code (the generated file is named style.css), the format is almost the same without any curly braces or semicolons and the indentation is required. Let’s take a look at the /public/stylesheets/style.styl file.
body
  padding: 0px
  margin: 0px
  font: 14px "Lucida Grande", Helvetica, Arial, sans-serif
  background: #9EA79D

h1
  margin: 0px
  background-color: #B3D8B3
  padding: 5px
  border-bottom: 2px solid

a
  color: #00B7FF

table, td, th
  border: 1px solid #106813
  border-collapse: collapse
  text-align: left

table
  margin: 15px

.dataColumn
  width: 200px
  color: #fff

th
  background-color: #1E3618

.even
  background-color: #E9E5DF

.odd
  background-color: #FFF

.inputField
  width: 200px

#btnAdd
  width: 100%
The stylus code is pretty simple and very easy to understand assuming that you know CSS already.
Go ahead and run the code now and test out the web interface to your REST service. Get the code to run here on github. Again use this command to start the server:
node app.js
Now you will have a web interface which looks something like this:
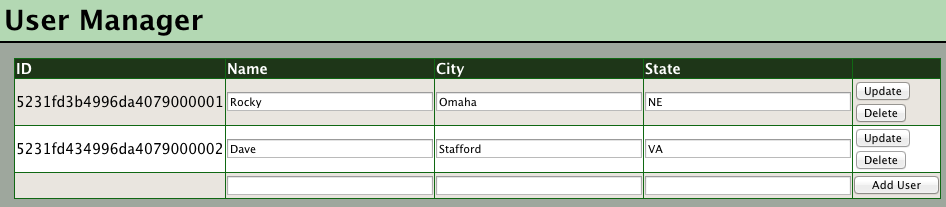
Each row lists one of the users which have been added to the service. You can change the editable values and click update or you can click delete to delete the user. The last row allows you to enter new fields and click “Add User” to add a new user using the service.